
After finding a method to enable root access on the Exynos variant of the Samsung Galaxy Note 8, developers have managed to do the same thing with the Snapdragon version as well. Rooting Samsung phones is becoming increasingly difficult, especially with Samsung incorporating Knox safety suite which makes rooting practically impossible, unless you don’t care about warranty.
Every time a conventional method of rooting is used, the KNOX counter gets tripped to 0x1, which means warranty is permanently lost. Luckily for all you Note 8 users with the Snapdragon chipset, a method called SamFAIL enables root access without tripping KNOX.
This means you get to root your Note 8 while also keeping your $1000 phone warranty. The team behind SamFAIL have managed to include root and modify the boot image of a stock firmware. The modified stock image can be flashed through Odin. This means the bootloader remains locked while having root access.
Contents
How To Root Snapdragon Samsung Galaxy Note 8 With SamFAIL (No Tripped Knox)
Note: This method works on the USA variant of the Note 8 (N950U). However, the developer says it should work on all Note 8 Snapdragon variants.
One ongoing issue with this root method is that charging is limited to only 80%, even though some users say that it is just a visual bug and the phone actually charges to 100%. Nonetheless, reverting back to stock is very easy, as all you need to do is to flash a stock firmware again.
Important Files
CSC Download
Flashing Note 8 System File
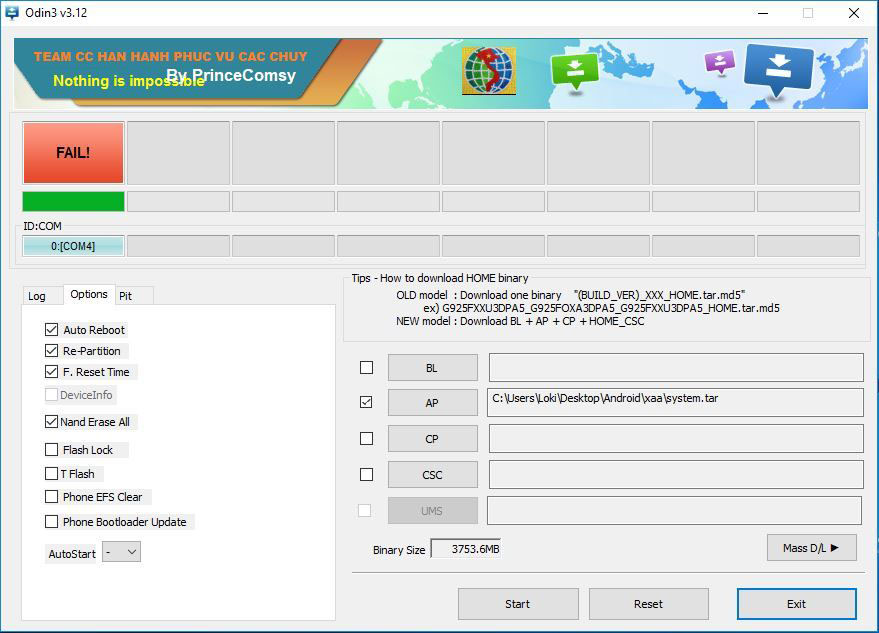
- Download “Note8_SamFAIL_System” from the download link above and extract the zip file.
- Turn off your Galaxy Note 8 and press the volume down, Bixby and power keys at the same time to go into download mode. Connect your phone to your computer via USB.
- Launch Odin on your computer, click the AP slot and select the pre-rooted image file named “system.tar”.
- Click on the “PIT” box and select the downloaded pit file as well.
- Under the “Options” menu, enable “Auto Reboot, F. Reset Time, NAND ERASE ALL and Re-Partition”.
- Make sure everything is in place and click the “Start” button.
Now Odin will display a big red “FAIL!” button. Do not worry, as the program has written the files.
Flashing Note 8 System Firmware
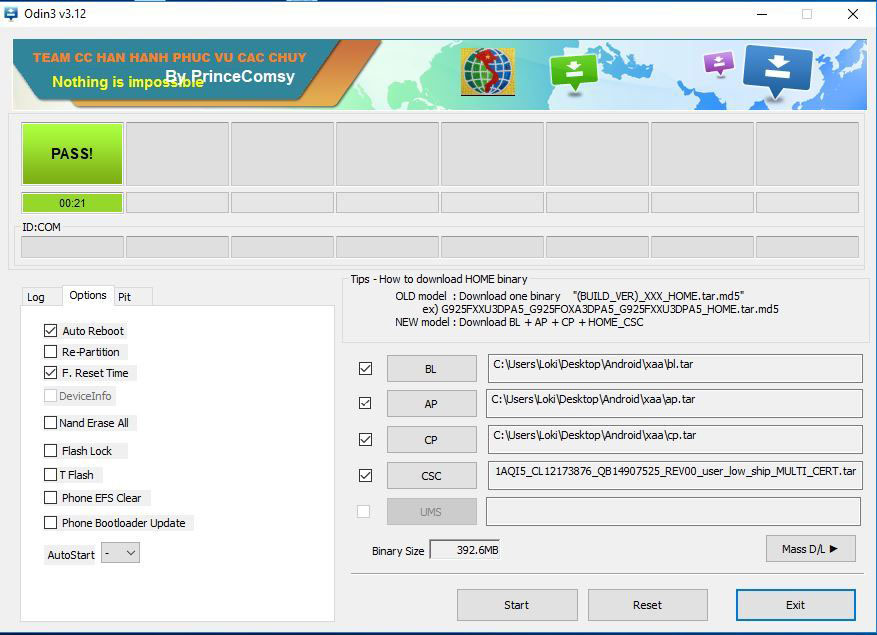
- After flashing the first file, you need to boot your Note 8 back into download mode.
- Now download “Note8_SamFAIL_Firmware” and your CSC file and extract them both.
- Click the “Reset” button to reset Odin for a new flashing process.
- After extracting the firmware, you will have a few files named “bl.tar, ap.tar, cp.tar”. Put them on Odin according to their names. For example, click on AP and select “ap.tar”, and so on.
- On CSC select the extracted .tar file.
- This time, make sure that only “Auto Reboot and F. Reset Time” are enabled. Uncheck all other options.
- Click the “Start” button and wait for the flashing process to finish.
The phone will boot up normally. Launch the SuperSU app and update the binary using the normal method. That is it. Enjoy root access on your Galaxy Note 8 Snapdragon variant.
Does this work on android pie?
nope