
In this article, you will learn how to take a screenshot on the Samsung Galaxy A52. If you are like most users, you probably take a lot of screenshots on your phone for various reasons. Maybe you want to show something to your friends, or maybe you just want to save something for later. No matter what, taking screenshots is a very important feature that all Android phones have, including the Galaxy A52.
If you have just gotten a brand new Samsung Galaxy A52, you might be wondering how to take a screenshot. Most Samsung phones have the same or similar methods for taking screenshots.
If you have used a Galaxy device before, you might be familiar with this article. If not, go ahead learn how to take a screenshot.
Contents
How To Take a Screenshot on the Samsung Galaxy A52
1. Galaxy A52 Screenshot – Hardware Keys
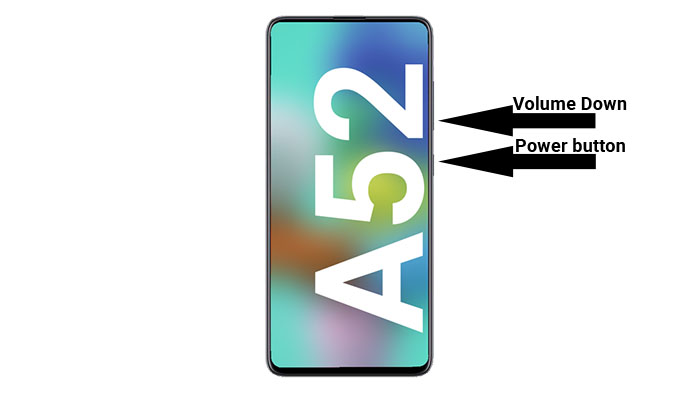
The first method to take a screenshot on your Galaxy A52 is to use the physical keys located on the side of the phone. This is the traditional method that is used the most.
Grab your phone, press the power button, and volume down button at the same time. Do not release the keys until the screen flashes white. This indicates that a screenshot has been taken. After the screen flashes white, a small menu bar will appear at the bottom of the screen. The menu will have three buttons. The first button is to edit and crop the image. The second button is to enable Scroll Capture, while the third button is to share the image on social media.
2. Galaxy A52 Screenshot – Palm Swipe to Capture
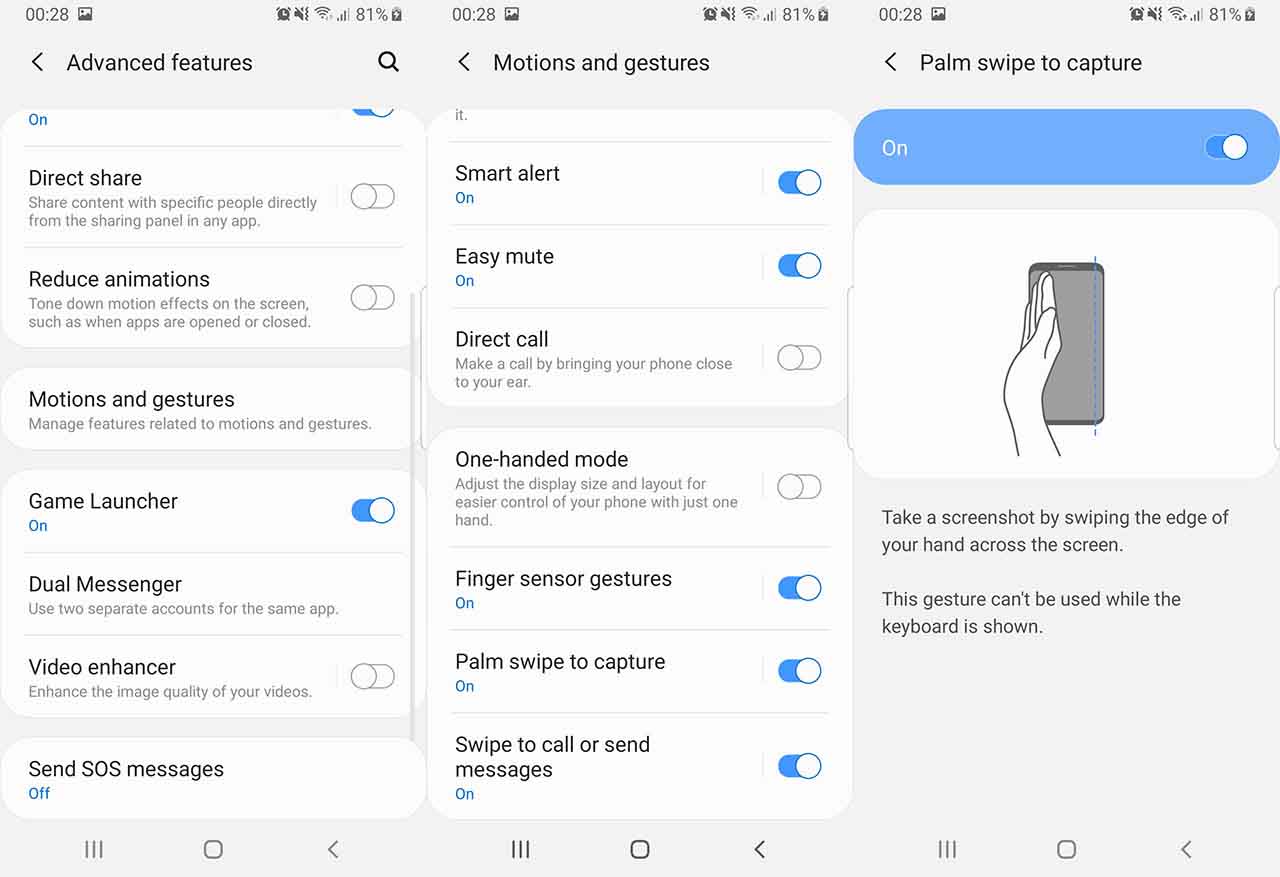
If for some reason the first method does not work due to broken buttons or some other issue, then you take a screenshot on your Galaxy A52 using the “Palm Swipe to Capture” feature. This is Samsung’s solution and does not require any hardware button.
To enable Palm Swipe, go to Settings -> Advanced Features -> Motions and Gestures. There will be an option called Palm swipe to capture. It is disabled by default. Tap on it to enable. Now swipe your hand across the screen to take a screenshot. The phone will vibrate to indicate that the task has been accomplished.
3. Galaxy A52 Screenshot – Assistant Menu
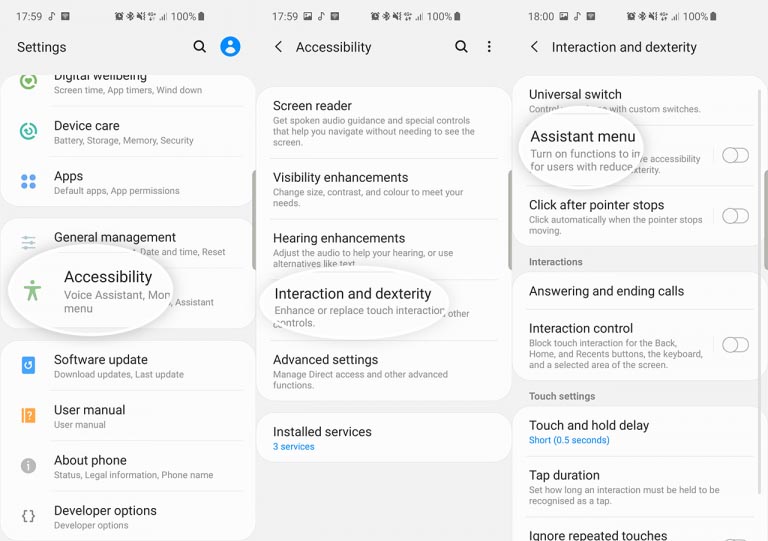
If you want something easier to work with, then you can try Assistant Menu. This is the last resort if all the hardware keys of your Galaxy A52 are broken and nothing else works for you.
To enable Assistant Menu, go to Settings > Accessibility > Interaction and dexterity and tap on the Assistant menu. A small circle will appear. Tap on the circle. A number of options will appear. Tap on Screenshots. The screen will flash white, indicating that a screenshot has been taken.
These are some ways you can take a screenshot on the Samsung Galaxy A52. It is nice of Samsung to include a few software features to be able to take screenshots when the hardware buttons are broken. Do you have any other ways to take a screen capture? Let us know below.
Hi,
Just wanted to offer some helpful feedback based on my customer experience.
In method 1 where you have stated “press the power button, and volume down button at the same time. Do not release the keys until the screen flashes white.”
It might be more helpful to say Press & Release the power button and volume down button at the same time. The screen will flash white to indicate a screenshot has been taken. (or something similar)
Based on the current description, I thought the buttons had to be held down for an extended period. Of course this just brings up the power off, restart, emergency options. Ended up watching a YouTube video and finally figured it out.
Thank you for this comment!!
Indeed, it doesn’t work if you hold the buttons down, to take a screenshot you need to only press then once and release it immediately, it will only work that way.
I read and watch many videos..ur comment is the only one that benefit me . Thank u
Omg thanks for this! Mine finally works following your advise 😊
That was so helpful thank you so much !!!!
On the galaxy a52, why after I take a screenshot the actual screenshot is very dark, do you know why? It should be the same. Thanks for your help!
Every screeshot I take comes out a little darker than the orginal screen. Is there a way to fix that? Tks.
Palm swipe is awkward and unreliable, double button or press is tricky. So I was encouraged to see the instructions for using Assistant menu. But even though I added the screen shot icon to the list of menu icons with + (and moved a couple of others to -), these changes weren’t made in either my dropdown menu or Assistant menu. How do I fix this, please?