
If you like to customize your Samsung Galaxy F42 5G and have complete control over its firmware, then the first thing you should do is root it. You can root the Samsung Galaxy F42 5G by using Magisk, the most popular rooting tool for Android phones. Magisk enables root and allows you to completely customize the system of the phone.
Samsung continues to make it difficult for users to root their devices. For example, you cannot flash custom binaries by default. You need to unlock the bootloader first, which will wipe all data. KNOX is also something to be kept in mind. KNOX counter gets tripped when custom binaries are flashed. This avoids the warranty in certain countries.
Below you have a detailed tutorial on how to root your Samsung Galaxy F42 5G. You will need to unlock the bootloader, patch the firmware, and install Magisk. If you get stuck in any of the steps of the tutorial, leave a comment down below and we will assist you.
Contents
How To Root Samsung Galaxy F42 5G with Magisk
Installing Magisk on your phone is done in three steps. The first step is to unlock the bootloader and make it accept unofficial images, the second step is to patch the firmware and flash it through Odin, and the last step is to correctly boot the phone with Magisk installed.
Before you go ahead with the tutorial below, please read all of the warnings below. Do not proceed if you do not want KNOX to be triggered or if you do not want your data to be erased. NaldoTech shall not be held responsible if anything wrong happens with your phone.
- This process will wipe your phone. When you unlock the bootloader for the first time to install Magisk, a full data wipe will be performed. Please make a data backup before you continue, otherwise, you will lose all of the data.
- Installing Magisk on your Galaxy F42 5G will trigger KNOX. This is an indicator that shows whether the firmware has been tampered with or not. Some stores will refuse warranty service if KNOX is tripped.
Pre-requisites
- Make sure that your phone is charged to at least 60%. This ensures the phone will not accidentally turn off during the process.
- Make a full backup of the data on your phone. The process below involves unlocking the bootloader, which will delete everything on your phone.
- Download and install the proper USB drivers for the Galaxy F42 5G. If you don’t have the proper drivers, the computer will not recognize your phone.
Step 1: Unlock the Galaxy F42 5G Bootloader
Samsung has introduced a new service called VaultKeeper. This means that you won’t be able to flash custom binaries or unofficial partitions unless VaultKeeper allows it. As a result, you need to unlock the bootloader before you proceed with the next step. Follow this article to learn how to unlock the bootloader on the Samsung Galaxy F42 5G.
Step 2: Patching the firmware with Magisk
There are two methods to patch the firmware. It depends on your phone’s Ramdisk info.
- Download the latest stock firmware for your Samsung Galaxy F42 5G. Follow our detailed guide on how to download and install stock firmware on Samsung Galaxy F42 5G.
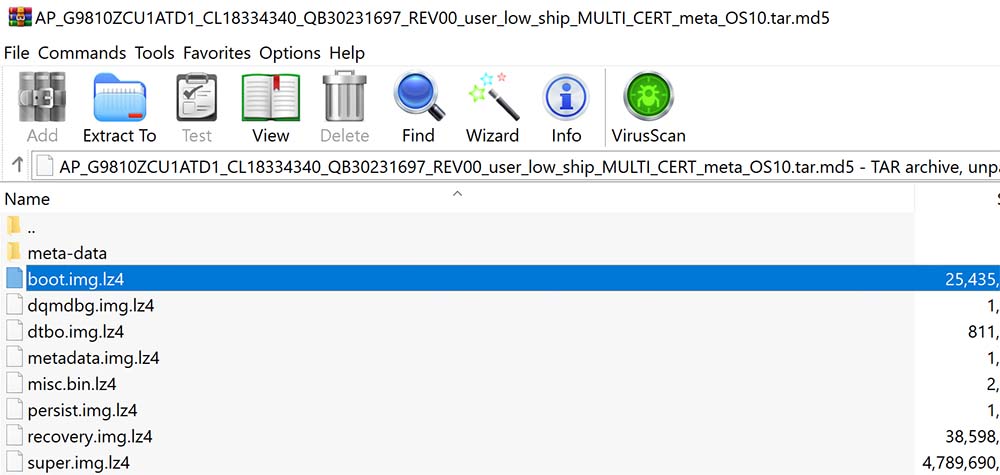
- Once you have downloaded the firmware, extract the firmware. You will see five files.
- Extract the AP .tar file. The file name starts with AP and ends with .tar.md5 (AP_[device_model_sw_ver].tar.md5).
- Download and install the latest Magisk app. Open the app and check the Ramdisk info. If it says:
-
- Ramdisk: Yes
- Out of the extracted files, find boot.img.lz4 from and create a tar archive (you can use 7-ZIP).
- Transfer the archived boot file to the internal storage of your phone.
- Open Magisk and go to Install > Install > Select and Patch a file. (Make sure Recovery Mode is off.).
- Ramdisk: No
- Out of the extracted files, find recovery.img.lz4 from and create a tar archive (you can use 7-ZIP).
- Transfer the archived boot file to the internal storage of your phone.
- Open Magisk and go to Install > Install > Select and Patch a file. (Make sure Recovery Mode is on.).
- Ramdisk: Yes
-
Step 3: Flashing patched Magisk image
- Navigate through the storage and select the archived image file. The image will be patched and the new version will be found under Internal Storage/Download/magisk_patched.tar.
- Transfer the patched file to your computer.
- Turn off your phone and boot your phone into download mode.
- On Odin, click on AP and select the patched .tar file. Uncheck “Auto Reboot” and click on Install.
- The tool will flash Magisk on your Samsung Galaxy F42 5G.
Now that you have installed Magisk on your Galaxy F42 5G, you can later update Magisk directly from the Magisk app. If you want to update to another version of the firmware, also patch it through Magisk first, and then flash it. With Magisk you can now enjoy all root benefits plus Magisk’s module system.